Installation – Uninstallation
Important tips before proceeding with installation?
- Uninstall any other anti-virus programs.
- Check available hard disk space.
- Exit all programs before starting the installation
How do I install Quick Heal for Mac?
- Insert the installation CD/DVD into the drive and click Quick Heal Installer.app or download the installation package from the Quick Heal website.
- To launch the installer, click Quick Heal Total Security.dmg. Follow the instructions on installation screen and then click Next to continue.
- The Read Me file and the End-User License Agreement screen appears and click Agree to continue.
Can I install Quick Heal on another Mac computer?
If you install Quick Heal on another Mac computer, it is necessary to register your software after you install Quick Heal. You must perform the Registration procedure by providing new Product Key . Any previously obtained Product Key is invalid and will not work on another machine.
One Product Key can only be used for one computer.
How do I un-install Quick Heal?
- Double click the "Quick Heal Un-installer" kept inside the Application folder or Insert the installation CD/DVD into the drive and click Quick Heal Un-installer.app.Follow the instructions on the uninstallation wizard and click Yes to continue.You may be prompted for credentials if the Password Protection is enabled for Quick Heal Total Security. Enter your password credentials and click OK.
- To continue with uninstallation without saving the repository, click Next. If you want to retain the repository, deselect the options to the respective repositories and click Next.
- Provide your user credentials.
The uninstallation process starts.
Fresh installation on macOS 10.13
macOS High Sierra 10.13 introduces a new feature that requires user approval before loading newly-installed third-party kernel extensions (KEXTs). When a request is made to load a KEXT that the user has not yet approved, the load request is denied
NOTE: If you do not Allow to load Kernel Extensions, Quick Heal Total Security will not be able to secure your computer against viruses, malicious websites, spam emails, and suspicious programs. Your computer will be at risk.
- During installation of Quick Heal Total Security for Mac on new macOS 10.13 , the following "System Extension Block" prompt appears.
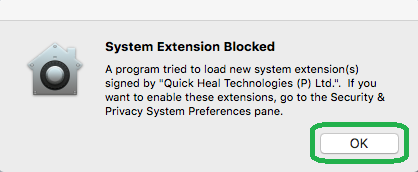
- To resolve, goto System Preferences>>Security & Privacy,
- Click the lock to make changes.
[You may need to enter your system credentials.]
- Click Allow to allow system extensions to be installed.
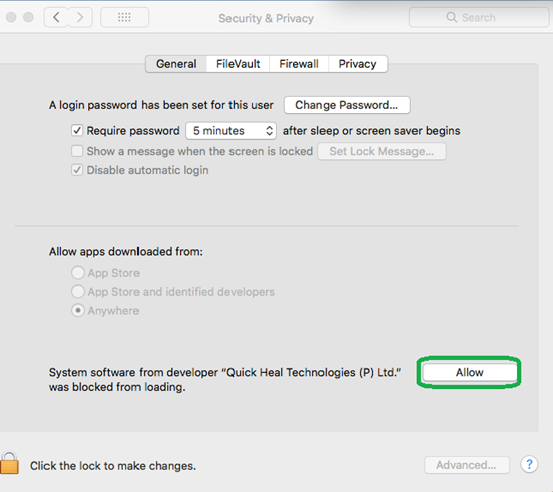
- After allowing, restart the System.
Upgrading to macOS 10.13 High Sierra with Quick Heal Total Security already installed
If you already have Quick Heal Total Security for MAC installed on your Mac System, Total Security will continue to work well after you upgrade to macOS 10.13 High Sierra.
Identifying System Requirements
To use Quick Heal Total Security, your system should meet the following minimum requirements:
- Mac OS X 10.7 or later
- Mac Computer with Intel Processor
- 512 MB of RAM
- 417 MB free hard disk space
- Internet connection to receive updates
Registration
How do I register my copy of Quick Heal?
After installation of Quick Heal, you will need to register your copy to activate it. You should Register and Activate your copy immediately after installation, as without Activation Quick Heal cannot be updated. Registered users can get other benefits like technical support, Parental Control, etc.
You can easily register your Quick Heal online with the help of the steps mentioned below:
- On the last page of installation window, click on ‘Register Now’ button, Quick Heal Registration Wizard will open automatically and the user will be asked to provide a product key. (To manually launch Registration Wizard, open Quick Heal dashboard and click Register Now.)
- Enter a valid Product Key (You can find the Product Key in your User Guide or inside the box.)
- Click ‘Continue’.
- Provide ‘Purchased From’ and ’Register for’ details.
- Click ‘Continue’.
- Enter your personal details.
- Click ‘Continue’.
- Before submitting, go through the details you have provided. If you want to modify any, click ‘Go Back’. Otherwise, click ‘Continue’.
- It will take a few seconds to register and activate your copy. Please stay connected to the Internet during this process.
- On completion, you will get a successful activation message.
Note:
Serial Number (product key) can be found in the User Guide or inside the product box. It can also be found in the email confirming your order.
I have re-installed Quick Heal. Should I register it again?
If due to any reason you need to reinstall your operating system or Quick Heal, it is necessary to reactivate your copy after reinstallation. You can easily reactivate your Quick Heal online. Click here to know how.
What to do if I lost my Product Key or Activation Number?
A Serial Number serve as a user’s Identity. In case you lose your Serial Number, you can obtain it by contacting Quick Heal Technical Support at a nominal charge.
How long can I use this registered copy?
You can use a registered copy until the expiry date of its subscription period. After the subscription period is over, you will need to renew the subscription to ensure your computer stays protected against new and emerging threats.
Where do I get the Product Key of Quick Heal on my computer?
- Open your Quick Heal dashboard
- Go to Quick Heal Dashboard > About Quick Heal Total Security > Click View Details
Here, you will find the product key, product version, virus database and subscription validity information.
Why is registration wizard not accepting my product key?
Registration wizard does not accept invalid product keys. To avoid such messages, please enter a valid product key as provided to you in the registration wizard.
In case the above problem persists even after following the above step, please contact Quick Heal Technical Support.
If I want to Remove my device, how can I proceed?
You can Remove your device from the RDM portal or contact Quick Heal Technical Support for assistance.
Is my device Remove automatically after uninstallation?
No, you must Remove it manually. You can do it from the RDM portal or by contacting Quick Heal Technical Support for assistance.
Can I Register my Quick Heal license of computer/laptop offline?
Yes, you can register your license offline using the 'Register offline' button from products "Dashboard"
Renewal
Why should I renew my copy of Quick Heal?
Once the subscription of your copy of Quick Heal expires, you need to renew it to continue receiving updates against the latest viruses. During renewal, you can renew your copy of Quick Heal for 1 year or 3 years.
What are the benefits of renewing Quick Heal?
The first benefit of renewing your Quick Heal copy is the continuous updates received during the renewed subscription period. These updates provide uninterrupted protection to your system and its data against the latest viruses and other threats.
Renewal is also a cost-effective solution when compared to purchasing a new product. The renewal code costs lesser than purchasing the new product and still provides uninterrupted protection against the latest and unknown threats and free upgrade to new version.
What are the benefits of renewing Quick Heal before the expiry date?
If you renew your copy of Quick Heal before subscription expiry, you will receive a bonus of two months' additional protection during renewal of subscription.
How can I obtain the Product key of Quick Heal?
If you have purchased the box copy of Quick Heal, the Product Key (or Serial Number) will be pasted on the User Guide or inside the box. If you have purchased the software online, you will find the Product Key in the email confirming the order.
What will be the validity period of Quick Heal upon renewal?
If you purchase a renewal code with validity for 1 Year or 3 Years and renew your copy of Quick Heal before subscription expiry, you will get subscription validity of 1 Year + 2 Months or 3 Years + 2 Months from the date of subscription expiry. If you renew your copy of Quick Heal after subscription expiry, then you will get 1 Year or 3 Year validity from the date of renewal.
Example 1
Mr. John has a copy of Quick Heal Total Security for Mac that expires on April 10, 2013. He purchases a renewal code on March 10, 2013 and renews his copy. His new subscription validity is June 10, 2014 (1 Year + 2 Months).
Example 2
Mr. Jack has a copy of Quick Heal Total Security for Mac that expires on April 10, 2013. He purchases a renewal code on May 10, 2013 and renews his copy. His new subscription validity is May 10, 2014 (1 Year).
Will I receive a CD upon renewal?
No, a CD is not provided for renewal. The purchased renewal code will extend the subscription of your copy of Quick Heal. If you want to upgrade to the latest Quick Heal product during your subscription validity, you can do it free of cost by downloading the Product Upgrade from the Upgrade page.
What is the validity period for renewal, after the subscription has expired?
As per Quick Heal Renewal Policy, if your copy of Quick Heal has expired then you can renew it within six months from the date of expiry.
What is the difference between reactivation and renewal?
If you need to uninstall your copy of Quick Heal from your machine and re-install it later, you must reactivate the software upon installation. This is called Reactivation. Extending the subscription validity of your copy of Quick Heal by purchasing a renewal code is called Renewal.
How can I get an additional pack with the renewal? Can I get a discount for the same?
During renewal of your copy of Quick Heal, if you purchase an additional copy of Quick Heal, you will receive a discount on the purchase of the additional copy. To know more, contact your nearest Quick Heal branch or distributor for the same. For a list of Quick Heal branches and distributors across the globe, please visit our
Locate Dealer page.
If I have any queries regarding renewal of Quick Heal, which number do I call?
You can contact Quick Heal Support Center. You can also contact your nearest Quick Heal branch or distributor. For a list of Quick Heal branches and distributors across the globe, please visit our Locate Dealer page.
How do I renew Quick Heal after purchasing the renewal code?
After purchasing the renewal code from the distributor, you need to renew the copy of Quick Heal by performing the following steps:
Note:
- In case you do not have the renewal code, select I do not have renewal code with me. I want to purchase renewal code online and then click Buy Now.
- In case you renewed your license but its expiry date has not extended, select I have already renewed my license. Please update my license from server and then click Continue.
- If you have purchased an additional renewal code, then the renewal can be performed only after 10 days of the current renewal.
Using Quick Heal
I want Quick Heal to scan my system at every first boot on daily basis. What to do?
You can schedule the scanner to run automatically at predetermined time and intervals. You can schedule the scanning for daily and weekly. This will supplement other automatic protection features to ensure that your machine remains virus-free.
To configure Schedule Scans, follow these steps:
- On the Quick Heal Total Security Dashboard, click Mac Security.
- On the Mac Security setting screen, click Schedule Scans.
The Scheduled Scans details screen appears.
- To create a new schedule for scanning, click Add.
The Add Scheduled Scan screen appears where you can create a new scan schedule
name, its frequency, and other details.
- In the Scan name text box, type a scan schedule name.
- Set Scan Frequency from Daily and Weekly.
- Set Scan Time either as Start scan at first boot or Start scan at Fixed Time. When you
select Start at first boot, you do not have to specify the time of the day to start the scan.
Scanning takes place only during the first boot irrespective at what time you start the
system.
- Set Scan priority from High and Low as you prefer.
- Set the Scan location:
- Set the Scan settings:
- To save your settings, click Save.
How do I set my Internet setting in case of proxy or sock4/5 connection?
To configure Proxy Setting, follow these steps:
- On the Quick Heal Total Security Dashboard, click Settings.
- On the Settings screen, click Proxy Support.
- On the Proxy Support screen, turn Proxy support ON to enable proxy support.
The Select proxy type, Enter server, Enter port, and user credentials text boxes are
enabled.
- Select the proxy type from HTTP, SOCKS V4, SOCKS V5 based on your preference.
- In the Enter Server text box, enter the IP address of the proxy server or domain name.
- In Enter port text box, enter the port number of the proxy server.
By default port number is set as 80 for HTTP and 1080 for SOCKS V4, SOCKS V5.
- Enter user name and password credentials.
- To save your settings, click Save.
Queries about newly introduced features
How can a user activate the Windows Parallel desktop build with his product key?
- Install Quick Heal for Parallel Windows from the link that has been sent via email or the link that appears on the success page.
- Once the installation has been completed, enter the Quick Heal Mac activation key when you are asked for it. It can also be done from Main UI >> Help >> About >> Register Now.
- Follow the instructions shown in the wizard.
NOTE : Pre-Quick Heal Windows-Desktop-Activation condition: Your Quick Heal desktop for Mac should be activated first.
How can the user install Quick Heal on a parallel desktop?
The following steps showcase how Quick Heal can be installed on a parallel desktop:
- Switch on the parallel desktop
- Install the parallel build from the Quick Heal website
- Activate Quick Heal with the existing Mac activation key
Can a user activate two parallel desktop machines using the activation key?
No. If two machines are activated with the same key, the other activated copy will be tagged as "Pirated".
What is Browsing Protection?
Quick Heal
Total Security for Mac,
Total Security,
Internet Security and
AntiVirus Pro has a feature called Browsing Protection. It runs Internet browsers in a virtual environment. Any malicious file downloaded in this environment is isolated from the real PC thus preventing such files from causing a malware infection.
I have enabled Password Protection to protect unauthorized access to Quick Heal product settings. But now I have forgotten my password and I am not able to access the settings.
Please contact Quick Heal Technical Support at support@quickheal.com.Click here to view Quick Heal Technical Support details.
What is the difference between Browsing and Phishing protection?
Browsing Protection automatically blocks access to websites that are loaded with malware codes and are designed to infected visitors’ machines.
Phishing Protection is a part of Web Security that blocks access to fake and phishing websites designed to steal personal and financial information from users.
How can I set a password to prevent others/children from accessing the parental control settings?
With Password Protection, you can restrict all other users from accessing Quick Heal Total Security so that no unauthorized users can make any changes in the settings.
To configure Password Protection, follow these steps:
- On the Quick Heal Total Security Dashboard, click Settings. Password Protection is turned off by default that you can turn on if required.
- On the Settings screen, turn Password Protection ON. The password protection screen appears.
- Enter password in the New Password text box and then confirm the password by entering it in Retype New Password. If you are setting the password for the first time, then Existing Password is disabled.
- To reset your password, click Password Protection.
- To save your setting, click Save.
How can I check the sites that children or other users accessed that I have blocked in the settings?
- Open Quick Heal Total Security.
- On the Quick Heal Total Security Dashboard, click Reports.
- On the Reports screen, click Parental Control Reports.
How to use Parental Control?
Parental Control can be used to control the Internet activity of the children or other users. Parents can decide which websites their children should visit and which they should not. Using the Parental Control feature, the parents can restrict categories of websites or block specific websites. The parents can also schedule Internet accessibility for their children.
What is Spam Protection?
With Spam Protection, you can block all unwanted emails such as spam, phishing and porn emails, from reaching into your mailbox. Spam Protection is enabled by default and we recommend you always keep the feature enabled.
How to view Users License details?
Open Quick Heal Total Security and then go to Menu > Quick Heal Total Security > About Quick Heal Total Security. On the About screen, click the View Details button.
How do I get Quick Heal Support?
To get support regarding any technical issues, follow these steps. On the Quick Heal Total Security menu bar, go to Help > Support. Here you can find various means for support.
How to access Quick Heal Total Security Help?
To access the Help option, follow these steps.
On the Quick Heal Total Security menu bar, go to Help > Quick Heal Total Security Help.
What is the use of Scan My Mac?
Scan My Mac is a complete scanning of your system. With Scan My Mac, you can scan the entire machine, files and folders excluding mapped network drives, folders, and files.
Why is it essential to enable Self Protection?
This feature prevents Quick Heal product files from getting altered or modified by viruses and malware or tampered by other applications.
What is Remote Device Management (RDM)?
RDM is a free portal where you can manage Quick Heal Total Security on your device.
Facing issue while enabling RDM feature
To use RDM feature on the trial build you need to REGISTER the product first by following the below steps:
- Install trial Build and do not ACTIVATE.
- Click “About Quick Heal Total Security” Under “Quick Heal Total Security” Menu.
- On this About window click “Register Now” and provide the Product Key.
- Once the above step is completed, you will be able to use RDM functionality.
How to create an account in Remote device Management?
To create an account Click on ‘Sign up’ button.
Enter Username, Mobile number, Product Key, Language preference, Verification code, check License agreement check box and Click Sign up button.
An email to activate the account will be sent to the registered email id.
In the email, click the ‘Activate’ button or run the given link in the browser. You will get Set Password screen to set the password for created account.
Once password is saved you can Sign in to your new created account and Add device.
Can I change my Quick Heal Remote Device Management account information?
Yes, you can change your account information such as your name, email address, mobile number, and password on the My Account page.
To navigate to the My Account page
- Go to the Quick Heal Remote Device Management Dashboard.
- Move your mouse over ‘Welcome your name’ and select My Account from the drop-down list.
Can I add more than one device to Quick Heal Remote Device Management account?
Yes, you can add up to ten (10) devices (smartphones/computers/laptops) in a single Quick Heal Remote Device Management account.
Can I add the same device in two different Quick Heal Remote Device Management accounts?
No.
Can I move a device added in one Quick Heal Remote Device Management account to another one?
No, but you can simply remove the device added in one Quick Heal Remote Device Management account and then you can add the same device to a different Quick Heal Remote Device Management account
How can I remove my device from Quick Heal Remote Device Management portal?
To remove your device having Quick Heal product, follow these steps:
- Go to the Quick Heal Remote Device Management Dashboard.
- Move your mouse over ‘Welcome your name’ and select License Summary from the drop-down list.
- Click on the Remove Product. The selected product will be removed.
To remove your device having other Quick Heal products, follow these steps:
- On Quick Heal Remote Device Management Dashboard, click the ‘Device Details’ link.
- Click the Remove Device button. The selected device will be removed.
How long will the OTP generated be valid to authorize my device/system?
It is recommended to authorize the device immediately. However, the OTP generated can be used to validate the mobile device within 10 minutes and computer/laptop within 48 hours.
Is it possible to generate an OTP again if it has expired?
Yes, you can generate the OTP again by clicking the 'EXPIRED (Resend OTP)' link (On the Quick Heal Remote Device Management Dashboard, click the Add Device tab and then click the 'EXPIRED (Resend OTP)' link).
Can I remove the device from the Quick Heal Remote Device Management for which I have not validated the OTP?
Yes, you can remove a device for which you have not validated the OTP yet.
- On the Quick Heal Remote Device Management Dashboard, click the Add Device tab.
- Under Pending Device, click the Pending link to the device for which you have not validated the OTP.
- On One-Time-Password (OTP) dialog box, click the Cancel OTP link.
Will my device be removed from my account if I do not validate the OTP within its validity period?
No, it will be added to the pending device list and you can generate OTP to add it in Quick Heal Remote Device Management account.
Can I set any device as default?
Yes, you can change any device as default. However, it is good to set such a device as default that you consider critical and you want to monitor it closely.
Do I need to add my device again if I reinstall Quick Heal?
No, you do not have to add the device again. Instead you will be asked to reauthorize the previously added device.
My account is locked. How can I unlock my account?
If you enter wrong login credentials three times, your Quick Heal Remote Device Management account will get locked.
To unlock your account, click the ‘Unlock Account’ button on the login page. An email with unlock link is sent to your registered email ID. In the email, click the ‘Unlock Account’ button or copy the given link in the browser. Your account will be unlocked.
Can I use Quick Heal Remote Device Management portal to communicate to the device even if my device is not connected to the Internet?
No, to communicate to a device through Quick Heal Remote Device Management portal, your device must necessarily be connected to the Internet.
What will happen if my device is not connected to the Internet for a long time (say more than 3 days)? Will the device still be viewed in the Quick Heal Remote Device Management account?
Yes, the device will remain added and can be viewed on the Quick Heal Remote Device Management portal, but the status of the device will not be updated and if the device is not connected to the Internet for 3 or more days, the status will be "System is Offline".
What should I do if status of a device is 'System is offline'?
Connect the device to the Internet. Your Quick Heal will automatically update the status to the Quick Heal Remote Device Management portal.
What should I do if I have forgotten the account password?
Enter username in login page. Click on the Forgot Password link.
An email to reset password will be sent to your registered email id.
In the email, click the ‘Reset Password’ button or copy the given link in the browser. You will get a window to reset your password.
Can I temporarily disable the Quick Heal Remote Device Management feature from my desktop product?
Yes, you just need to toggle the 'Remotely Manage Quick Heal' button (Settings > Remotely Manage Quick Heal.)
Can I see license details of my all added devices?
Yes, you can see the license details of all your devices from the License Summary page.
Can I renew my Quick Heal license of computer/laptop from Quick Heal Remote Device Management account?
Yes, you can renew your license from Quick Heal Remote Device Management portal using the 'Renew Now' link from dashboard.
Can I change the settings of Quick Heal remotely from the Quick Heal Remote Device Management account?
No, the settings of Quick Heal cannot be changed from the Quick Heal Remote Device Management account.
Can I see the My Device Details on Quick Heal Remote Device Management Portal?
Yes, you can see the Device Details with below steps:
- Log on to your Quick Heal Remote Device Management account.
- On Dashboard, click Device Details tab.